Releases
⚠ Apply Previous Updates ⚠
Before upgrading to version 3.3.0 you must apply the upgrade steps for each previous version of CluedIn between your currently installed version and 3.3.0, that has an upgrade process.
Previous upgrade scripts can be found at:
3.3.0 Upgrade guide
NOTE: As this is a major version upgrade (
3.3) it requires downtime of the cluster while the upgrade is performed.
The goal of this guide is to show you how to migrate CluedIn data from an old installation to a new one.
There are significant improvements, fixes and new features in the new cluedin-platform Helm chart and it is simpler to re-mount the old disks (PVCs) into a new installation.
Pre-Upgrading Planning
- Ensure all ingestion jobs / syncs / pushes etc to CluedIn are paused. Check the processing logs to make sure no ingestion/enriching work is being carried out.
- Ensure you have a copy of all important passwords / secrets that may be stored in configuartion files. Mainly, the SQL Server SA password. The secret is usually called
cluedin-sql-admin(or<releasename>-sql-admin) - Ensure you know any configmap changes (for example, environment variable setting updates) that may have occured during deployment and were not captured in the
values.yaml.
Caveats / Warnings
All upgrades are different. This example shows how to migrate a default installation. With each installations there are customizations that might need to be moved across, so it is up to the upgrader to ensure that any values.yaml customisations are still valid with the new chart. You will probably fine that many things can be removed due to consistent defaults.
Things to consider:
-
Application Version - Version is now configured globally so where you might previously have had:
submitter:
  image: cluedin/cluedin-micro-submitter-node:3.2.5
gql:
  image: cluedin/cluedin-ui-gql:3.2.5
ui:
  image: cluedin/ui:3.2.5
… these entries can be removed as version is controlled centrally via:
global: image: tag: "3.3.0" - Nesting - Previously all changes to
values.yamlwere located in the root of the values.yaml patch file, for example:cluedin: roles: main: resources: limits: memory: "4Gi" requests: memory: "2Gi" processing: count: 0 crawling: count: 0… with the new chart you need to address them to the correct part of the chart (
platform/application/infrastructure) and nest them accordingly. So the previous example would become:application: cluedin: roles: main: resources: limits: memory: "4Gi" requests: memory: "2Gi" processing: count: 0 crawling: count: 0 - Components (Enrichers/Crawlers) - Ensure you update to the latest 3.3.0 versions if available. ALL enrichers require updating to support the new configuration model
-
Infrastructure modification such as resource sizing - Most components now use official charts so please check their individual projects for how to make changes. See
cluedin-infrastructure/values.yamlfor hints.Table of current versions:
Chart Name Chart Version App. Version Source elasticsearch 7.14.0 7.8.0 https://helm.elastic.co kube-prometheus-stack 20.0.1 20 https://prometheus-community.github.io/helm-charts neo4j 4.2.8-1 3.5.30 https://neo4j-contrib.github.io/neo4j-helm rabbitmq 8.24.13 3.9.11 https://charts.bitnami.com/bitnami redis 15.6.10 6.2.6 https://charts.bitnami.com/bitnami mssql-linux 0.12 14.0.3401.7 (2017-CU25) [Internal Fork] haproxy-ingress 0.13.6 0.13.6 https://haproxy-ingress.github.io/charts cert-manager 1.7.1 1.7.1 https://haproxy-ingress.github.io/charts
Tools
You will need the latest versions of:
- Kubectl: https://kubernetes.io/docs/tasks/tools/#kubectl
- Helm: https://helm.sh/docs/intro/install/
You will also need a kubeconfig file that has access to the cluster you are upgrading.
You may also want to use a GUI tool such as Lens or k9s to view progress.
Upgrade Steps
1. Backup
Be sure to take a full backup of all your data before beginning the upgrade process. Also, make sure to test/familiarise yourself the restore process before continuing.
A good tool (but out of scope for this guide) is Velero. Velero is an open source tool to safely back up and restore, perform disaster recovery, and migrate Kubernetes cluster resources and persistent volumes.
Velero consists of:
- A server that runs on your cluster.
- A command-line client that runs locally.
This can backup and restore the whole cluster and is simple to use. Of course, take in Azure Disk snapshots is also another way (Velero can help do this for you as well).
2. Ensure CluedIn Helm repos are added and up-to-date.
helm repo add cluedin https://cluedin-io.github.io/Charts/
helm repo update
3. Upgrade Helm chart to latest support version
The latest version contains fixes to support preserving PVC disks when the chart is uninstalled.
helm upgrade -n cluedin cluedin cluedin/cluedin --version 3.2.5-update.4 --reuse-values
Note: Here we use the --reuse-values to use the previous releases values. Be sure this wont reset any manual changes that may have occured.
Validation Step: Check that all PVC resources, that belong to deployments, now have a helm.sh/resource-policy=keep annotation. This ensures they will not be removed in the following steps. PVC belonging to StatefulSet resources are always ignore and will not be removed regardless.
kubectl get pvc -n cluedin -o=jsonpath='{.items[?(@.metadata.annotations.helm\.sh/resource-policy=="keep")].metadata.name}'
You can also protect PVs against accidental PVC deletion by patching the reclaim policy of the PV (not PVC) with a command such as:
kubectl get pv -n cluedin
kubectl patch pv -n cluedin -p '{"spec":{"persistentVolumeReclaimPolicy":"Retain"}}' <PV name> <Another PV name>
4. Stop All Running Pods
This will shut down all processes gracefully and ensure any locks on files, particularly for the database pods, are released.
kubectl scale deployments -n cluedin --replicas=0 --all
kubectl scale statefulsets -n cluedin --replicas=0 --all
Validation Step: Check no cluedin pods are running.
kubectl get pods -n cluedin
5. Uninstall CluedIn Helm installation
Remove the previous cluedin application using:
helm uninstall -n cluedin cluedin
This will remove all Helm-managed resources that are part of the CluedIn Helm installation. Any resources not managed by Helm (for example, the docker registry secret which was likely created manually) will remain. Also, the PVC disks that contain the essential CluedIn data will remain.
Validation Step: All CluedIn resources should have been removed but all PVCs should have remained behind.
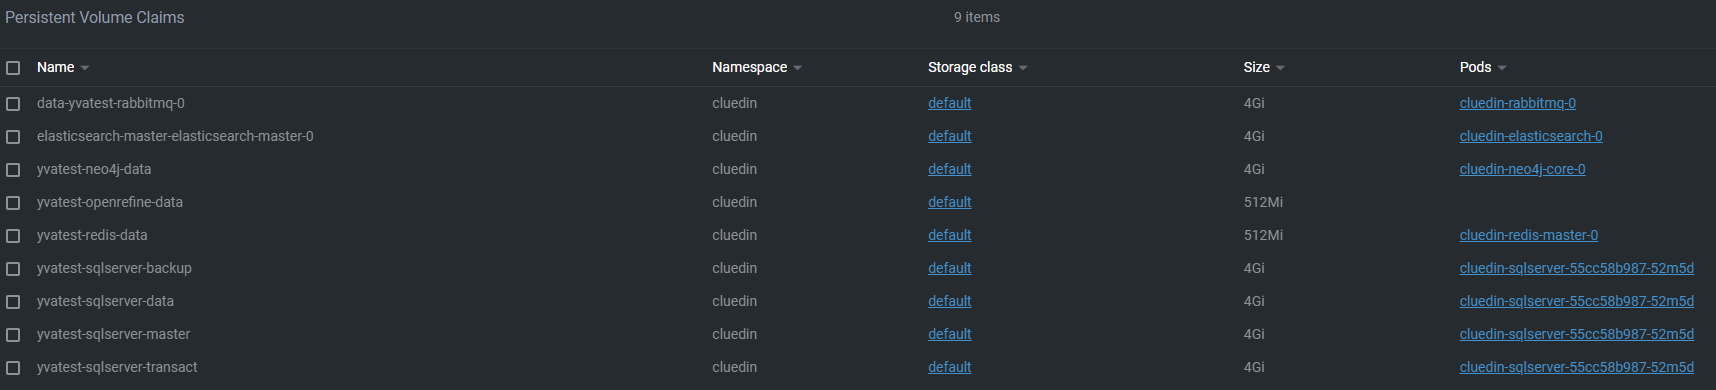
kubectl get pvc -n cluedin

cluedin-neo4j-data                            ...
cluedin-sqlserver-backup                      ...
cluedin-sqlserver-transact                    ...
cluedin-sqlserver-master                      ...
cluedin-sqlserver-data                        ...
data-cluedin-rabbitmq-0                       ...
elasticsearch-master-elasticsearch-master-0   ...
cluedin-redis-data                            ...
cluedin-openrefine-data                       ...
6. Uninstall cert-manager chart
Cert-Manager is now installed as part of the new cluedin-platform chart. Any previous versions should be removed. Please take a note if you have made any configuration changes to cert-manager that may need to be re-applied to the new version.
helm uninstall cert-manager -n cluedin
Hint: If this doesnt match then you can search for the name of the release using: helm ls --all-namespaces
7. Ensure you can download cluedin-platform chart
helm repo update

helm search repo cluedin-platform
NAME                         CHART VERSION APP VERSION	DESCRIPTION
cluedin/cluedin-platform     1.0.0         3.3.0      	Deploys all parts of the CluedIn platform
8. Prepare values-upgrade.yaml
The installation will take the form of two stages:
- CluedIn Infrastruture install - This is where we will remount our existing data (PVC disks) and perform any database upgrades needed.
- CluedIn Application install - This is where we will install the rest of the application
We will be using the new cluedin-platform helm chart that contains both of these stages and has the ability to toggle these parts via the values.yaml passed to the Helm chart.
The first part of this is to configure the infrastructure services and skip the application install (for now).
The need for as Nuget PAT token has been removed in this version as all packages are now available on CluedIn’s public nuget feed. If you have a secret called cluedin-server-nuget-secret then please remove it before proceeding.
Note: If you still need to access develoment feeds or have private feeds already configured the just remove the extraSecrets section of the configuration below and it will re-use the existing secret.
Example upgrade configuration:
This patch will re-mount the old PVCs into the new infrastucture objects.
(values-upgrade.yaml)
global:
  image:
    tag: "3.3.0"

infrastructure:
  enabled: true

  haproxy-ingress:
    enabled: false

  elasticsearch:
    enabled: true
    persistence:
      enabled: false
    extraVolumes:
      - name: data
        persistentVolumeClaim:
          claimName: "elasticsearch-master-elasticsearch-master-0"
    extraVolumeMounts:
      - name: data
        mountPath: /usr/share/elasticsearch/data

  monitoring:
    enabled: true

  mssql:
    enabled: true
    sapassword: "yourStrong(!)Password" # <- Be sure to update this to your SA password before running!
    persistence:
      enabled: true
      existingDataClaim: cluedin-sqlserver-data
      existingTransactionLogClaim: cluedin-sqlserver-transact
      existingBackupClaim: cluedin-sqlserver-backup
      existingMasterClaim: cluedin-sqlserver-master

  neo4j:
    enabled: true
    core:
      persistentVolume:
        enabled: false
        mountPath: /olddata
      additionalVolumes:
        - name: upgradedata
          persistentVolumeClaim:
            claimName: cluedin-neo4j-data
      additionalVolumeMounts:
        - name: upgradedata
          mountPath: "/data"

  rabbitmq:
    enabled: true
    persistence:
      existingClaim: "data-cluedin-rabbitmq-0"

  redis:
    enabled: true
    master:
      persistence:
        existingClaim: "cluedin-redis-data"
  seq:
    enabled: false

application:
  enabled: false
This is used as part of the new installation:
helm upgrade -i cluedin-platform -n cluedin cluedin/cluedin-platform --values values-upgrade.yaml
What this stage will do:
- Create empty versions of all the infrastructure services (SQL Server / Neo4J / ElasticSearch etc)
- Install supporting charts such as HAProxy / CertManager / Monitoring
- Mount all previous PVCs into the new services (apart from OpenRefine as this is done in the application step below)
- SQL Server will upgrade the internal SQL Server tables to the latest Cumulative Update security version (CU) - This can take some time.
One the service are all green / ready then proceed to the next stage, being careful that SQL Server has finished its upgrade.
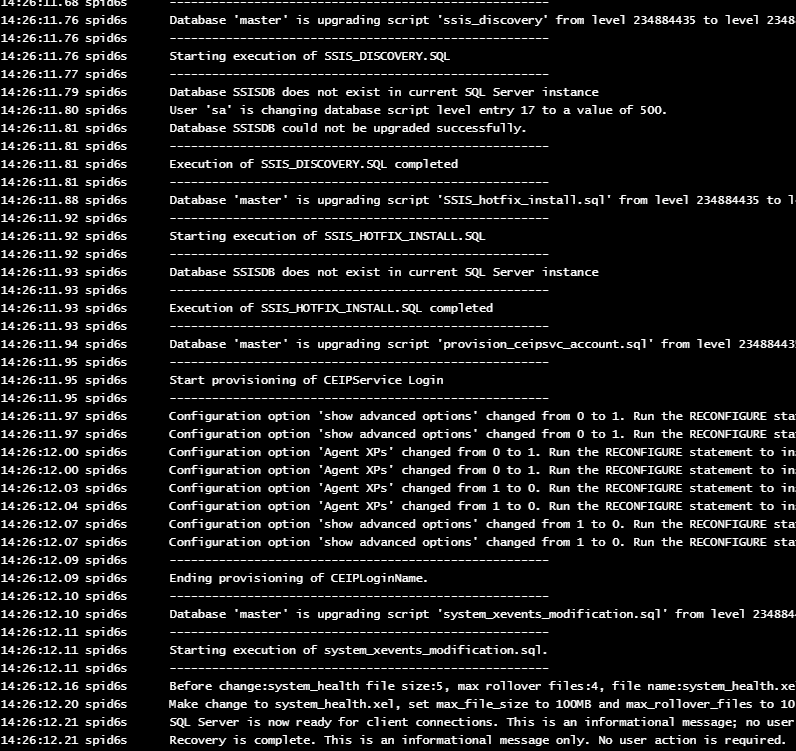
Validation Step:
In the cluedin-sqlserver logs you will see various upgrade notifications..
In tools like Lens you can see PVCs remounted to the new pods (except OpenRefine) ..
9. Create Database Upgrade ConfigMaps
Create a file called pre-install.sql ..
USE [DataStore.Db.ExternalSearch]
GO

DELETE FROM [dbo].[ExternalSearchQuery]
GO
Create a file called post-install.sql ..
USE [DataStore.Db.MicroServices]
GO

INSERT INTO [dbo].[datasetendpointreceipts](id,dataSetId,failed,total,retry,successful,updatedat,createdat)
  SELECT
    newid() as id
    ,id as dataSetId
    ,JSON_VALUE(stats, '$.failed') as failed
    ,JSON_VALUE(stats, '$.total') as total
    ,JSON_VALUE(stats, '$.retry') as retry
    ,JSON_VALUE(stats, '$.successful') as successful
    ,getdate() as updateat
    ,getdate() as createdat
  FROM [dbo].[datasets]
GO

UPDATE [dbo].[DataSets] SET expectedTotal=JSON_VALUE(stats, '$.total')
GO

DECLARE @id uniqueidentifier
DECLARE @model NVARCHAR(max)
DECLARE @legacy CURSOR
DECLARE @updatedModel NVARCHAR(MAX);

SET @legacy = CURSOR FOR
SELECT [id], [model]
FROM   [DataStore.Db.OpenCommunication].[dbo].[Rules]

OPEN @legacy
FETCH NEXT
FROM @legacy INTO @id, @model
WHILE @@FETCH_STATUS = 0
BEGIN
    PRINT 'ID: ' + CONVERT(NVARCHAR(50), @id)
    PRINT 'Current: ' + @model

    SET @updatedModel = REPLACE( @model, 'CluedIn.Rules, Version=3.2.0.0', 'CluedIn.Rules, Version=3.3.0.0')
    PRINT 'Updated: ' + @updatedModel

    Update [DataStore.Db.OpenCommunication].[dbo].[Rules]
    set Model = @updatedModel
    where Id = @id

    FETCH NEXT
    FROM @legacy INTO @id, @model
END

CLOSE @legacy
DEALLOCATE @legacy
Create configmaps from the files ..
kubectl create configmap -n cluedin cluedin-init-sqlserver-upgrade-pre-install --from-file=pre-install.sql
kubectl create configmap -n cluedin cluedin-init-sqlserver-upgrade-post-install --from-file=post-install.sql
10. Install Controller CRDs
Install the latest CluedIn CRDs into the cluster.
kubectl apply -n cluedin -f https://cluedin-io.github.io/Charts/cluedin-crd/cluedin-crd.1.0.0.yaml
11. Update values-upgrade.yaml
Adding the links to the upgrade scripts and enabling the application installation.
global:
  image:
    tag: "3.3.0"
  containerImages:
    initSql:
      scripts:
        preInstall: "cluedin-init-sqlserver-upgrade-pre-install"
        preInstallKey: "pre-install.sql"
        postInstall: "cluedin-init-sqlserver-upgrade-post-install"
        postInstallKey: "post-install.sql"

infrastructure:
  enabled: true

  elasticsearch:
    enabled: true
    persistence:
      enabled: false
    extraVolumes:
      - name: data
        persistentVolumeClaim:
          claimName: "elasticsearch-master-elasticsearch-master-0"
    extraVolumeMounts:
      - name: data
        mountPath: /usr/share/elasticsearch/data

  monitoring:
    enabled: true

  mssql:
    enabled: true
    sapassword: "yourStrong(!)Password"
    persistence:
      enabled: true
      existingDataClaim: cluedin-sqlserver-data
      existingTransactionLogClaim: cluedin-sqlserver-transact
      existingBackupClaim: cluedin-sqlserver-backup
      existingMasterClaim: cluedin-sqlserver-master

  neo4j:
    enabled: true
    core:
      persistentVolume:
        enabled: false
        mountPath: /olddata
      additionalVolumes:
        - name: upgradedata
          persistentVolumeClaim:
            claimName: cluedin-neo4j-data
      additionalVolumeMounts:
        - name: upgradedata
          mountPath: "/data"

  rabbitmq:
    enabled: true
    persistence:
      existingClaim: "data-cluedin-rabbitmq-0"

  redis:
    enabled: true
    master:
      persistence:
        existingClaim: "cluedin-redis-data"
  seq:
    enabled: false

application:
  enabled: true

  system:
    runDatabaseJobsOnUpgrade: true

  openrefine:
    persistence:
      existingClaim: "cluedin-openrefine-data"
Running the same command again ..
helm upgrade -i cluedin-platform -n cluedin cluedin/cluedin-platform --values values-upgrade.yaml
This will:
- Run the database upgrade scripts (pre-install => DACPAC install => post-install)
- Mount the OpenRefine data (the last PVC to be mounted)
- Install the CluedIn application services
Note: This time we run with runDatabaseJobsOnUpgrade: true - normally with an upgrade we dont run the database upgrade scripts (as this adds an extra overhead to upgrade time, especially if only small changes are being made). This flag forces the database upgrade scripts to run even on an upgrade. If you want to run further upgrades then it it worth setting this flag back to false once the databases have been installed.
12. Troubleshooting
Post upgrade, if there is any routing related issues, upgrade the haproxy helm chart version in-place using:
helm upgrade haproxy-ingress -n <HAProxy Namespace> haproxy-ingress/haproxy-ingress
Post Upgrade Steps
At this stage, your envionrment should be up and running again. You must now perform some additional steps that act upon the data in your installation.
As some of these steps may edit data - you may also wish to take another backup so that you can restore to this point in the process if required.
1. Update Enricher Data
Enrichers have been updated to enable configuration at runtime. This requires changes to entries in the database and elastic indexes so that existing data can be mapped to new configurations.
To register new enricher configurations you must trigger an authenticated POST request to api/enrichers/checkforupgrades.
To make this easier, the following PowerShell script may be used:
param(
    [Parameter(Mandatory)]
    [string]$CluedIn,
    [Parameter(Mandatory)]
    [string]$Org,
    [Parameter(Mandatory)]
    [string]$Username,
    [Parameter(Mandatory)]
    [string]$Password,
    [switch]$NoCluedInProxy
)

$ErrorActionPreference = 'Stop'

$accessToken = $null
$authEndpoint = if($NoCluedInProxy) { "${Cluedin}:9001" } else { "${Cluedin}/auth" }
Write-Host "Logging in" -ForegroundColor Green
$login = Invoke-WebRequest -Uri "${authEndpoint}/connect/token" -Method 'POST' -Body "client_id=${Org}&grant_type=password&password=${Password}&username=${Username}"
if($login.StatusCode -eq 200) {
    $accessToken = $login.Content | ConvertFrom-Json | Select-Object -ExpandProperty access_token
}

if(!$accessToken) {
    Write-Error "Could not login - please check parameters and confirmed user credentials"
}

$apiEndpoint = if($NoCluedInProxy) { "${Cluedin}:9000" } else { "${Cluedin}/api" }
Write-Host "Upgrading enrichers" -ForegroundColor Green
$enrichers = Invoke-WebRequest -Uri "${apiEndpoint}/api/enrichers/checkforupgrades" -Method 'POST' -Headers @{ Authorization = "Bearer ${accessToken}" }
if($enrichers.StatusCode -eq 200) {
    $foundContent = $enrichers.Content | ConvertFrom-Json
    $foundContent | Format-Table
    $nonZero = $foundContent | Where-Object { $_.RecordsProcessed -gt 0 }
    if($nonZero) {
        Write-Warning "One or more providers may still have data to update - run this script again"
    } else {
        Write-Host "All enrichers are updated" -ForegroundColor Green
    }

} else {
    Write-Error "Could not upgrade enrichers - please check parameters"
}
Save the script locally as enricher-upgrade.ps1 and invoke with:
pwsh .\enricher-upgrade.ps1 -CluedIn http://app.<my domain> -Org <org name> -Username <username> -Password <password>

# ALTERNATIVE If you are running a local instance using CluedIn Home or localhost
pwsh .\enricher-upgrade.ps1 -CluedIn http://localhost -Org <org name> -Username <username> -Password <password> -NoCluedInProxy
The script will provide details of the results and inform you if you need to run the script again.
2. Update Rule data
The Rule Builder has been updated to allow more nested actions to have their own unique filter. To enable this feature each rule in the system must be re-configured.
To register new enricher configurations you must trigger an authenticated POST request to api/rules/checkforprocessingruleupgrades.
To make this easier, the following PowerShell script may be used:
param(
    [Parameter(Mandatory)]
    [string]$CluedIn,
    [Parameter(Mandatory)]
    [string]$Org,
    [Parameter(Mandatory)]
    [string]$Username,
    [Parameter(Mandatory)]
    [string]$Password,
    [switch]$NoCluedInProxy
)

$ErrorActionPreference = 'Stop'

$accessToken = $null
$authEndpoint = if($NoCluedInProxy) { "${Cluedin}:9001" } else { "${Cluedin}/auth" }
Write-Host "Logging in" -ForegroundColor Green
$login = Invoke-WebRequest -Uri "${authEndpoint}/connect/token" -Method 'POST' -Body "client_id=${Org}&grant_type=password&password=${Password}&username=${Username}"
if($login.StatusCode -eq 200) {
    $accessToken = $login.Content | ConvertFrom-Json | Select-Object -ExpandProperty access_token
}

if(!$accessToken) {
    Write-Error "Could not login - please check parameters and confirmed user credentials"
}

$apiEndpoint = if($NoCluedInProxy) { "${Cluedin}:9000" } else { "${Cluedin}/api" }
Write-Host "Upgrading enrichers" -ForegroundColor Green
$rules =  Invoke-WebRequest -Uri "${apiEndpoint}/api/rules/checkforprocessingruleupgrades" -Method 'POST' -Headers @{ Authorization = "Bearer ${accessToken}" }
if($rules.StatusCode -eq 200) {
    $processedCount = [int]$rules.Content
    if($processedCount -gt 0) {
        Write-Warning "One or more providers may still have data to update - run this script again"
    } else {
        Write-Host "All enrichers are updated" -ForegroundColor Green
    }

} else {
    Write-Error "Could not upgrade enrichers - please check parameters"
}
Save the script locally as rules-upgrade.ps1 and invoke with:
pwsh .\rules-upgrade.ps1 -CluedIn http://app.<my domain> -Org <org name> -Username <username> -Password <password>

# ALTERNATIVE If you are running a local instance using CluedIn Home or localhost
pwsh .\rules-upgrade.ps1 -CluedIn http://localhost -Org <org name> -Username <username> -Password <password> -NoCluedInProxy
The script will provide details of the results and inform you if you need to run the script again.
3. Re-configure Enrichers
You will now be able to login and re-configure your enrichers.
Previously configuration was handled through the CluedIn environment configuration. Now you can login and configure enrichers under
the Prepare area of CluedIn.
(Optional) Create an Organization CRD for each existing organization
If the organization(s) within CluedIn was created using an old bootstrap or manual method, in order to support features using the CLuedIn Controller we need to create a reference Organization CRD. We do not need to create a new Organization, just a CRD with a reference to the Organizations ID.
To do this we need to get the Organizations identifier.
Search for the organziation name (for example foobar from within CluedIn.
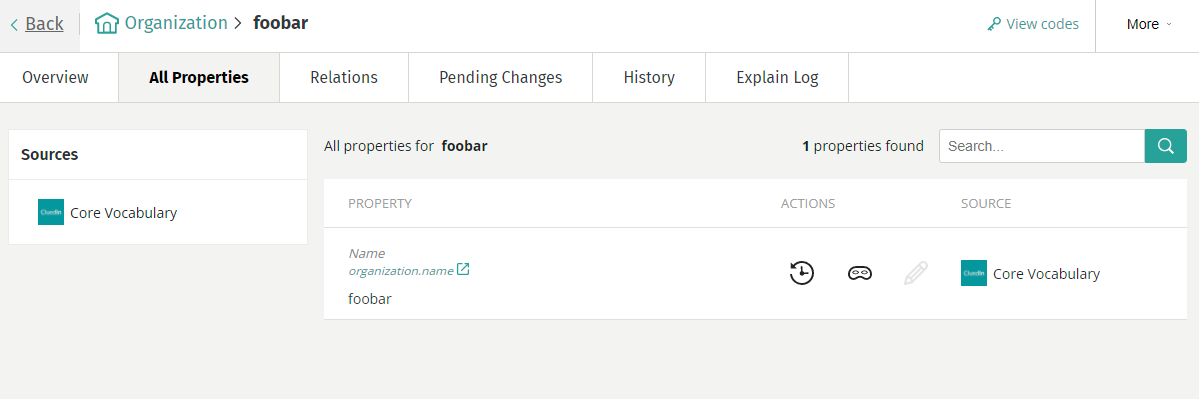
.. and click the View Codes button in the top right of the panel ..
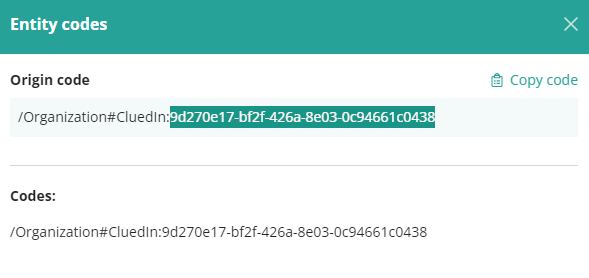
The GUID that appears here is the Organizations identifier. We can use this to create the Organization CRD.
First we need a secret so that the controller can log into the organization ..
apiVersion: v1
kind: Secret
metadata:
  name: foobar-org
data:
  password: Rm9vYmFyMjMh
  username: YWRtaW5AZm9vYmFyLmNvbQ==
type: Opaque
Then we create the Organization CRD..
apiVersion: api.cluedin.com/v1
kind: Organization
metadata:
  name: foobar-organization
spec:
  id: '9d270e17-bf2f-426a-8e03-0c94661c0438'
  name: foobar
kubectl apply -n cluedin -f foobar-organization.yaml
You can verify everything is correct by running the get orgs command again ..
kubectl get orgs -n cluedin

NAME                      ORGANIZATION NAME   ADMIN USER SECRET   ORGANIZATION ID                        PHASE    STATUS
foobar-organization       foobar              foobar-org          9d270e17-bf2f-426a-8e03-0c94661c0438   Active   Organization [foobar] activated.